Redecorating the hall, stairwell, and entry way is one of the biggest projects we have undertaken. The combined wallspace is quite large and there are plenty of doors and other obstacles to work around. Thankfully, there are no high ceilings, so we won't have to juggle with scaffolding or tall ladders.
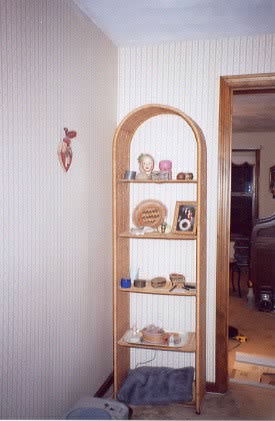
Upstairs hall - Before #1 |
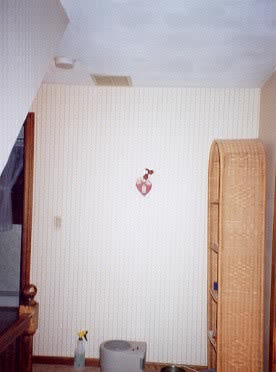
Upstairs hall - Before #2 |
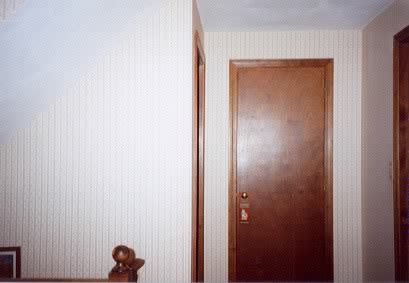
Upstairs hall - Before #3 |
Stage One - Planning
Live on PussiCam on March 4, 2000.
I began the project by taking measurements for the quantity of wallpaper the job would require. Some DIY books tell you to simply measure the overall area and subtract out doors and windows, and then add some percentage for spare. However, this method does not work very well, as I discovered when working on the master bathroom - a couple mistakes, and you have to go out and buy another roll of paper and hope that the dye lot matches. My new method is to actually plan out the strips, determining placement and calculating required length. If you are working around a lot of doors and windows, you may end up wasting a lot of paper because you have to cut out parts of the strips, so this counting method takes the wasted paper into account. For such a large project, I also purchased two extra rolls of paper for spare. With so many doors and narrow corner spaces, I'm probably going to make a lot of mistakes.
We selected a light striped paper with very pale pinkish beige tones. The simple, neutral pattern should work well in contrast to whatever we put in all of the other rooms. The light color should also brighten up the space. The paper is vinyl with a little bit of texture, rather than simple flat paper. This particular pattern is random match, so it should be easy to align.
Length required, as measured: 301.5 ft
Roll width: 20.5 in
Roll length: 33 ft/roll
Therefore, I need about 10 rolls of paper, plus a couple of spares. By the way, these are double rolls. It's very strange when you order wallpaper. They order it as single rolls, but you end up with double rolls. You can't actually buy a single roll. There was some historical reason for this, but I don't remember anymore.
What was the cost, you ask? We were very lucky - we chose a paper which happened to be on sale. The retail price for a double roll of this particular paper was $40. I got it for a bargain $18.00/double. The total was $266.55 - an excellent price for such a large area, not to mention such a nice paper.
One last note on the paper - I bought it at Harmon's Paint and Wallpaper in Lowell. You can't beat going to a specialty store for wallpaper and paints. It beats the crowds and the disorder at Home Depot, provides you with a better selection, and gives you improved service. The prices are good, sometimes excellent. The people at Harmon's have been outstanding at answering general questions and helping with paint selection - and they remember you if you visit a few times.
Stage Two - Stripping
Live on PussiCam on March 11 - 12
I had an easy job of stripping the old paper in the bathrooms - vinyl paper comes off in one motion. In contrast, the hall and stairwell paper is stuck tight, as it is ordinary flat paper. Visit our webcam this Saturday and Sunday to see how the stripping is going. After comparing notes with other people, I have selected to steam the paper off instead of using the DIF wallpaper adhesive dissolver. The latter method sounds a little too messy. Was it a wise choice?
March 12th morning update: We're halfway through the weekend and about halfway through stripping wallpaper. The steamer was a good move, although I've also been using a sort of detergent called Fast that one of the guys at Harmon's recommended. It comes as a concentrate that you mix with hot water. To remove the paper, I start by scoring the paper with the scraper's razor. After that I sponge on the soapy water a few times and let it sit, following up with some steaming and more sponging if needed. The paper has been coming off pretty easily and the job isn't too messy - just a little wet. As it turns out, the walls have been painted underneath (or maybe it's sizing?), so the surface is in pretty good shape. So far there are just a few spots that I'll need to patch up and paint. There are also a lot of nail holes, some in strange places. We managed to get the stairwell banister off without too much trouble. We were a little concerned because all of the screws were showing signs of being stripped. Wayne managed to get them all out, although he had a tough time with the last one.
March 12th evening update: The old wallpaper is gone. I finished pulling the last of it off late this afternoon. Today's work went much more quickly because I didn't have to work around so many narrow spaces.
Stage Three - Surface Preparation
This step is pretty easy. During the next week I'll patch all of the nail holes and finish cleaning the walls and the ceilings. Finally, on Friday night, I'll cover all of the woodwork with plastic to prepare for painting. I've already located all of the circuit breakers for the lights and sockets, so I'm all ready to begin painting!
March 18th update: Well, this step is easy, but I didn't actually manage to get all of it done during the week. I went around patching nail holes and wall defects with spackle on Thursday night with the intention of sanding them all on Friday. Of course, sanding creates a lot of dust, which you then have to vacuum and wash away. That really has to be done before the ceiling prep work and painting. Too ambitious a task for a Friday night, which is better suited to relaxing! I've sanded a few of the patches, but I decided to save the prep work for today, Saturday. If things go well I might be able to paint the ceiling tomorrow... but we'll see. I probably won't use the camera while I'm sanding - don't want to get all that dust on the lens.
March 19th udpate: I decided not to start painting today. Everything is pretty much ready for painting now, but I just felt like I needed a break. Also, it is pretty cold outside again today, and I would really like to open up the windows when I paint to air out the house a little. Our temperatures are supposed to warm back up into the 50's again next weekend, so it should make things a little easier. At any rate, you can still check out PussiCam today to see our cats.
Stage Four - Painting and Sizing
Live on PussiCam on March 25 - 26
March 25th morning update: I'm armed with my scuzzy painting clothes and lots of supplies. Today I start painting! It looks like we're going to have some nice weather outside today, too, so I can open up all of the windows. Quite a change from last weekend! You probably won't see the cats much while I'm painting. They're going to be staying in the basement and out of the paint. The last thing I need is a cat tracking paint footprints through the house or getting painted hair. But you might see them while I'm setting up, or maybe later in the day. This is probably going to be a two day job.
March 26th morning update: The ceiling is finished. It doesn't look that much different, just a little cleaner and brighter than before. All of the marks are gone, too. There's more painting to do today, though. I plan to paint the door and the baseboard radiators, as well as the patched holes and spots where the wallpaper pulled off paint--however, I don't have to size the entire wall surface, since the walls are already painted. It should be easier work, but there's still a lot of it. We might go shopping for light fixtures as well, if there are any places open. I pulled off the small globe light fixtures because they were old and tacky. Not sure yet what the replacements will be.
March 27th udpate: So much for my plans. I didn't quite get around to painting anything yesterday. Funny how that happens on Sundays. We ended up doing shopping and errands. Oh well.. I'd still like to start wallpapering next weekend, so I'll probably skip the door and the radiators until after the papering is done.
Stage Five - Wallpapering
Live on PussiCam on April 1 - 2
April 1st update: It's the middle of Saturday afternoon and I'm finally getting started with wallpaper. We've just been out looking at new light fixtures. We bought one for the entry way, which I'll put up tonight; the one for the upstair's landing is on order and should be in within a week or two. I've just finished bringing all of my stuff upstairs. I'm not sure if I'll manage to get everything done this weekend. There's a lot to do. So time to put some grubby clothes on, set a CD going, and unroll some paper.
April 2nd update: Well, I've done a little more than a third of the upstairs hallway, including some of the more difficult spots around doors and the stairwell banister. I've got a lot more to do today. It's turning out to be pretty hard work. The paper I bought seems to be overloaded with adhesive - it's prepasted - and I'm getting lots of adhesive pockets and it's taking a lot of effort to get them out. It's kind of frustrating. Last night as I thought I was just about finished, I turned off one of the lights, and lo and behold the shadows revealed a lot of spots I'd missed and I had to spend another hour working them out. I'm going to call one of our friends who does a lot of wallpapering to see if he has any suggestions. I've used prepasted paper before in both bathrooms and never had this kind of trouble, so it must be the particular brand of paper.
Live on PussiCam on April 8 - 9
April 8th update: I'm still working on the upstairs...
Live on PussiCam on April 16
Live on PussiCam on April 22 - 23
April 22nd update: Will I ever finish? I'm going to attack the long stairwell wall today.
April 23rd update: I made good progress yesterday - I did nearly all of the long wall. Well, actually, I did do all of it, finishing the last strip about 10:30 at night, but somehow I picked up an angle on my way down and it was crooked, so I ripped the last one off before finishing. I've been thinking about how to fix it, and have decided to modify the angle of the paper over the last door frame (right before the end) where it will be less noticeable. I'm going to try fixing it this morning. Stripes are hard to work with over long distances! They pick up every skew in the walls and doors, plus whatever you put in yourself when you are smoothing the paper. I haven't had any trouble on the shorter sections but the same thing happened on one of the longer walls in the upstairs hall... fortunately in a dark corner where it wasn't so noticeable, as there was less opportunity to correct it.
I don't think I will do stripes in future if I can help it.
If I make good progress today, I might actually finish. We'll see how fast things go. I'll be working around the banister and the remaining doors, so it might not be quick work.
April 24th update: Well, I didn't finish yesterday, but it's really coming along. I think I finally figured out how to deal with the stripes. They're very challenging because the walls aren't plumb. Neither are the doors. And the ceiling isn't perfectly level. The best trick, it seems, is to try to keep the paper plumb using a bubble. You can make slight adjustments over doors and windows. The small distance between the top of the door and the ceiling is a lot less noticeable than the long vertical line at a corner. You recorrect the line above the door by trimming the paper slightly and then leaving the next sheet of paper alone. The stripe at the trim won't be perfect, but you won't be able to tell from a distance (the eye has trouble with stripes anyway). Of course, you can't do too much trimming. This method worked pretty well around the front door area, and I ended up with only a very slight angle at the left corner - not bad considering how out of alignment everything was.
The end is in sight though. I have three short walls left: the wall to the dining room, the coat closet wall, and the banister side of the stairwell.
Live on PussiCam on April 29 - 30
April 30th update: Well, nearly two months after I started this project I finally finished wallpapering. The last strips of wallpaper went up today. Finally!
Stage Six - Final Touches
More April 30th: Not much left to this project now. Wayne helped me put the banister back up today, so everything looks basically finished. I'm still waiting for the ceiling light to come in so I can install it, but that's pretty minor. I'd also like to paint the back of the front door and the radiator downstairs. But those tasks are pretty minor compared to the wallpapering. Whew! What a job. I'm going to start clearing the dining room out next. It never ends! The hallway looks so nice now that it is done. What a change a little paint and wallpaper can make.
May 11th udpate: The ceiling light finally came in this week. It's now installed, so the project is essentially finished. However I never did get around to painting the front door... I'll do that at some point when I'm doing some other painting.
Come back for pictures of the finished project in a month or so.
The end! Until the next project...
Photo of the finished project:
 |